| Autor |
Wiadomość |
 Temat: Bluzeczka z elementów kwiatowych Temat: Bluzeczka z elementów kwiatowych |
laila
Odpowiedzi: 3
Wyświetleń: 7813
|
 Forum: Problemy, pytania Wysłany: Śro 30 Kwi, 2014 20:02 Temat: Bluzeczka z elementów kwiatowych Forum: Problemy, pytania Wysłany: Śro 30 Kwi, 2014 20:02 Temat: Bluzeczka z elementów kwiatowych |
dziękuje za schematy , które szydełko będzie dobre i jaka grubość nici , mi się wydaje ze cieńsze będą lepsze .
[ Dodano: Sob 09 Lut, 2019 18:53 ]
Czy można jeszcze raz prosić o linki do schematu bluzeczki po latach strony nie działają a już zapomniałam wzorów chciałabym wrócić do zrobienia tej bluzeczki , z góry dziękuję .
[ Dodano: Sob 09 Lut, 2019 18:55 ]
Czy można prosić jeszcze raz o schematu do tej bluzeczki po tylu latach wszystko mi przepadło a bardzo chce dokończyć bluzeczkę . |
| Temat: Bluzeczka z elementów kwiatowych |
laila
Odpowiedzi: 3
Wyświetleń: 7813
|
Forum: Problemy, pytania Wysłany: Śro 30 Kwi, 2014 15:06 Temat: Bluzeczka z elementów kwiatowych |
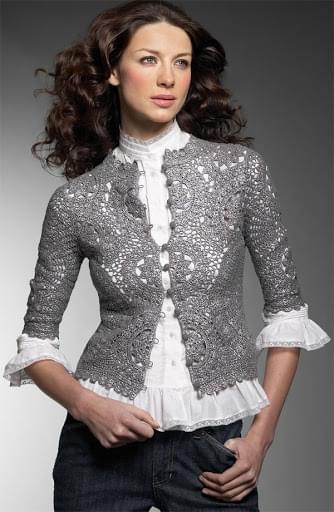
Poszukuje schematu tej bluzeczki ,a może by tak razem ja zrobić w dziale szydełkujemy online , przepraszam jeśli są błędy, ale mam problem z klawiatura ponieważ ma ustawienia na język angielski
 |
| Temat: szydełkowanie przedłuża życie???????? |
laila
Odpowiedzi: 37
Wyświetleń: 55237
|
Forum: Pogaduszki szydełkowe Wysłany: Nie 02 Paź, 2011 18:01 Temat: szydełkowanie przedłuża życie???????? |
| moja babcia też lubiła szydełkować i robić na drutach a mimo to na starość miała alzhaimera i dożyła 78 lat więc myślę że nie ma na to reguły |
| Temat: Porządkujemy dział szydełkowy |
laila
Odpowiedzi: 128
Wyświetleń: 217137
|
Forum: Szydełko Wysłany: Śro 09 Mar, 2011 19:30 Temat: Porządkujemy dział szydełkowy |
| czy może mi ktoś powiedzieć gdzie się podział dział on-line ? nie mogę znaleźć wszystkich robótek |
| Temat: GDAŃSK- spotkania |
laila
Odpowiedzi: 1155
Wyświetleń: 632635
|
Forum: Nasze spotkania Wysłany: Wto 09 Lis, 2010 02:40 Temat: GDAŃSK- spotkania |
| kiedy będzie następne spotkanie w gdańsku ,bardzo chciałabym się nauczyć frywolitek na żywo |
| Temat: zakupy w Londynie |
laila
Odpowiedzi: 3
Wyświetleń: 10771
|
Forum: Frywolitki Wysłany: Pią 22 Sty, 2010 14:15 Temat: zakupy w Londynie |
| witaj,powinien być sklep HOBBY CRAFT jest tam wszystko czego dusza zapragnie , są produkty do szydełkowania , drutów jak i do robienia biżuterii , dla plastyków ale jest tam drogo . |
| Temat: Z jezyka angielskiego na polski |
laila
Odpowiedzi: 110
Wyświetleń: 196252
|
Forum: Szydełko Wysłany: Czw 26 Lis, 2009 01:13 Temat: Z jezyka angielskiego na polski |
rozumiem , no szkoda  |
| Temat: Z jezyka angielskiego na polski |
laila
Odpowiedzi: 110
Wyświetleń: 196252
|
Forum: Szydełko Wysłany: Wto 24 Lis, 2009 23:15 Temat: Z jezyka angielskiego na polski |
| jeszcze mam pytanie gdzie moge dodac punkt za pomoc bo w tym temacie nie widze takiej opcji |
| Temat: Z jezyka angielskiego na polski |
laila
Odpowiedzi: 110
Wyświetleń: 196252
|
Forum: Szydełko Wysłany: Wto 24 Lis, 2009 23:13 Temat: Z jezyka angielskiego na polski |
no naprawde dziekuje za przetłumaczenie ,teraz dla mnie jest jasne o co chodzi , jeszcze raz dziekuje  |
| Temat: Grażynki drutowanie |
laila
Odpowiedzi: 269
Wyświetleń: 151738
|
Forum: Nasze prywatne galerie Wysłany: Wto 24 Lis, 2009 01:43 Temat: Grażynki drutowanie |
własnie też ten sweterek maron chciałam zrobic , wpierw znalazłam go w galerii Maranty ale nie ma juz schematu do niego i ja z prosba o wzór jak wykonac ten piekny sweterek |
| Temat: Tłumaczenie z j.angielskiego |
laila
Odpowiedzi: 384
Wyświetleń: 329626
|
Forum: Druty Wysłany: Wto 10 Lis, 2009 15:08 Temat: Tłumaczenie z j.angielskiego |
| Grażyna napisał/a: | Jest tutaj w "drutach" niedaleko, w ktoryms dziale, temat zwiazany ze skrótami angielskimi, wystarczy przeczytać opracowania kolezanek i sobie przetłumaczyc skróty. Ja tak robię, mam wszystko wydrukowane i zerkam w razie potrzeby.
Znalazłam: słowniczek |
dziekuje bardzo za pomoc |
| Temat: Z jezyka angielskiego na polski |
laila
Odpowiedzi: 110
Wyświetleń: 196252
|
Forum: Szydełko Wysłany: Pon 09 Lis, 2009 20:04 Temat: Z jezyka angielskiego na polski |
ja szukam tłumaczenia do tej spódnicy ,czy ktos by mi pomógł ?
Size: XS - S - M - L - XL - XXL
Materials: DROPS KARISMA
300-350-400-450-500-550 g colour no 53, charcoal grey
50-50-50-50-100-100 g colour no 05, black
50-50-50-50-100-100 g colour no 21, light grey
50-50-50-50-50-100 g colour no 19, white
DROPS CROCHET HOOK size 4 mm – or size needed to get 1 square = 9.5 x 9.5 cm and 18 sts x 12 rows in PATTERN = 10 x 10 cm.
DROPS BUFFALO HORN BUTTONS no 535: 5 pcs.
PATTERN:
ROW 1: 1 tr in each dc, finish row with 1 ch to turn with.
ROW 2: 1 dc in each tr, finish row with 3 ch to turn with.
INCREASING TIP: Inc by working 2 tr in 1 dc.
SKIRT: Worked back and forth from top down, and sewn tog at the side afterwards.
Crochet 136-157-178-196-217-236 loose ch with charcoal grey with crochet hook size 4 mm. Crochet first row as follows: 1 dc in 2nd ch from hook, 1 dc in each of the next 1-1-1-5-5-3 ch, * skip 1 ch, 1 dc in each of the next 6 ch *, repeat from *-* = 116-134-152-168-186-202 dc. Continue in PATTERN – see above – until finished measurements.
REMEMBER CROCHET TENSION!
After 5 rows (last row is a row with dc) insert 6 markers in piece as follows: First marker after 11-12-14-14-16-19 sts, then 19-22-25-28-31-33 sts between each marker = 10-12-13-14-15-18 sts after the last marker. On next row inc 1 tr before all markers – SEE INCREASING TIP and repeat the inc on every other row (inc after and before marker alternately) a total of 9 times = 170-188-206-222-240-256 sts. Continue until piece measures 29-31-33-35-37-39 cm (or desired length), cut the thread.
COLOURS OF SQUARES:
SQUARE A: Beg + round 1 = charcoal grey, round 2 = light grey, round 3 = white, round 4 = black, round 5 = charcoal grey.
SQUARE B: Beg + round 1 = black, round 2 = charcoal grey, round 3 = white, round 4 = light grey, round 5 = charcoal grey.
SQUARE C: Beg + round 1 = white, round 2 = charcoal grey, round 3 = black, round 4 = light grey, round 5 = charcoal grey.
SQUARE D: Beg + round 1 = white, round 2 = charcoal grey, round 3 = light grey, round 4 = black, round 5 = charcoal grey.
CROCHET SQUARES: Crochet 6 ch with crochet hook size 4 mm and form a ring with 1 sl st in first ch.
ROUND 1: 3 ch, 2 tr in ring, * 3 ch, 3 tr *, repeat from *-* a total of 3 times and finish with 3 ch and 1 sl st in 3rd ch from beg of round. Turn piece.
ROUND 2: 3 ch, 2 tr in first ch-loop, 3 ch, 3 tr in the same ch-loop, * 1 ch, 3 tr in the next ch-loop, 3 ch, 3 tr in the same ch-loop *, repeat from *-* a total of 3 times, finish with 1 ch and 1 sl st in 3rd ch from beg of round. Turn piece.
ROUND 3: 3 ch, 2 tr in the first ch-loop, 1 ch, * 3 tr in the next ch-loop, 3 ch, 3 tr in the same ch-loop, 1 ch, 3 tr in the next ch-loop, 1 ch *, repeat from *-* a total of 3 times, 3 tr in the next ch-loop, 3 ch, 3 tr in the same ch-loop, 1 ch, finish with 1 sl st in 3rd ch from beg of round. Turn piece.
ROUND 4: 3 ch, 2 tr in the first ch-loop, 1 ch, * 3 tr in the next ch-loop, 3 ch, 3 tr in the same ch-loop, 1 ch, 3 tr in the next ch-loop, 1 ch, 3 tr in the next ch-loop, 1 ch *, repeat from *-* a total of 3 times, 3 tr in the next ch-loop, 3 ch, 3 tr in the same ch-loop, 1 ch, 3 tr in the next ch-loop, 1 ch, finish with 1 sl st in 3rd ch from beg of round. Turn piece.
ROUND 5: Crochet 1 dc in each tr and 1 dc in each ch, finish with 1 sl st in first dc.
1 square = approx 9.5 x 9.5 cm.
NUMBER OF SQUARES: Crochet 5-5-6-7-7-7 squares of A, 6-6-6-7-8-8 squares of B, 5-6-6-6-7-8 squares of C and 4-5-6-6-6-7 squares of D = a total of 20-22-24-26-28-30 squares.
ASSEMBLY: Sew skirt tog at the side, edge to edge, but leave a 15 cm opening at the top. Sew squares tog, edge to edge, to a string as shown in fig-1, and then sew tog to form a ring. Now sew squares to bottom of skirt, edge to edge.
BUTTONHOLE LOOPS: Crochet buttonhole loops on the side of opening towards front piece as follows (beg at bottom of opening): 1 dc in each of the first 2 sts, 3 ch, skip 1 cm, * crochet 1 dc in each st for 2 cm, 3 ch, skip 1 cm *, repeat from *-* a total of 4 times, and finish with 2 dc at the top. Turn and work return row as follows: 1 dc in each dc and 3 dc in each ch-loop, cut the thread.
BUTTONHOLE BAND: Crochet 5 rows with dc along the side of opening towards back piece, cut the thread. Sew on buttons. |
| Temat: Tłumaczenie z j.angielskiego |
laila
Odpowiedzi: 384
Wyświetleń: 329626
|
Forum: Druty Wysłany: Pon 09 Lis, 2009 19:17 Temat: Tłumaczenie z j.angielskiego |
czy mogłby mi ktos przetłumaczyc to:
DROPS jacket with squares in ”Fabel”. Size S – XXXL.
DROPS design: Pattern no FA-105
Size: S - M - L - XL - XXL - XXXL
Materials: DROPS FABEL
400-450-500-550-600-650 g colour no 542, green mix.
DROPS DOUBLE POINTED NEEDLES, POINTED NEEDLES and CIRCULAR NEEDLE (40 cm) size 3 mm –
or size needed to get 24 sts x 48 rows in garter st = 10 x 10 cm.
DROPS Shell buttons w/hole, no 526: 7 pcs.
GARTER ST (in the round): K 1 round, P 1 round.
GARTER ST (back and forth on needle): K all rows.
SQUARE:
Cast on 8 sts on double pointed needles size 3 mm with Fabel. Distribute sts on 4 needles with 2 sts per needle.
Insert a marker in the first, 3rd, 5th and 7th st. K st with marker on every round and work remaining sts in GARTER ST – see above.
Continue in the round, AT THE SAME TIME inc 1 st on each side of each st with marker (= 8 inc per round) on every other round. Inc by making 1 YO and work YO into back of loop on next round to avoid a hole. Continue like this until there are 96-104-104-112-112-120 sts on round = 24-26-26-28-28-30 sts per needle.
1 square measures approx 10-11-11-12-12-13 x 10-11-11-12-12-13 cm.
KNITTING TIP:
When turning mid piece, tighten thread before working return row to ensure a smooth transition.
LEFT FRONT PIECE:
See Fig.1.
Square 1: Work SQUARE – see above. REMEMBER THE KNITTING TENSION! Cast off the first 24-26-26-28-28-30 sts (= from first to 2nd marker), slip the next 24-26-26-28-28-30 sts (= from 2nd to 3rd marker) on a stitch holder, cast off the next 24-26-26-28-28-30 sts (= from 3rd to 4th marker) and slip the last 24-26-26-28-28-30 sts (= from 4th to first marker) on another stitch holder.
Square 2: Like Square 1.
Square 3: Work SQUARE. Cast off the first 24-26-26-28-28-30 sts, slip the next 24-26-26-28-28-30 sts on a stitch holder, slip the next 24-26-26-28-28-30 sts on another stitch holder and the last 24-26-26-28-28-30 sts on yet another stitch holder.
Square 4: Work SQUARE. Cast off the first 24-26-26-28-28-30 sts, slip the next 24-26-26-28-28-30 sts on a stitch holder, cast off the next 24-26-26-28-28-30 sts and cast off the last 24-26-26-28-28-30 sts
Square 5: Like SQUARE 4.
Square 6: Work SQUARE. Cast off the first 24-26-26-28-28-30 sts, slip the next 24-26-26-28-28-30 sts on a stitch holder, slip the next 24-26-26-28-28-30 sts on another stitch holder and cast off the last 24-26-26-28-28-30 sts.
Place the first 3 squares as shown in Fig.1. The dotted lines mark sts on stitch holders, the solid lines mark cast off sts.
Sew tog Square 1 and 2, edge to edge with neat sts. Sew tog Square 2 and 3 in the same way.
Slip sts from stitch holders on the one side of squares (= sts towards square 4, 5 and 6 and the side of jacket) on the same needle = 72-78-78-84-84-90 sts.
Now work gusset as follows – see KNITTING TIP!:
Row 1 = RS, from bottom edge and up. Work gusset in garter st.
SIZE S + M:
Work all sts, turn piece and work return row. Work 60-64 sts, turn piece and work return row. Work 48-50 sts, turn piece and work return row. Work 36 sts, turn piece and work return row. Work 22 sts, turn piece and work return row. Work all sts, turn piece and work return row. Work 36 sts, turn piece and work return row. Work 48-50 sts, turn piece and work return row. Work 60-64 sts, turn piece and work return row. Work all sts, turn piece and work return row. Cast off.
SIZE L + XL:
Work all sts, turn piece and work return row.
Work 60-64 sts, turn piece and work return row. Work all sts, turn piece and work return row.
Work 42-44 sts, turn piece and work return row. Work all sts, turn piece and work return row.
Work 24 sts, turn piece and work return row. Work all sts, turn piece and work return row. Work 24 sts, turn piece and work return row. Work all sts, turn piece and work return row. Work 42-44 sts, turn piece and work return row. Work all sts, turn piece and work return row. Work 60-64 sts, turn piece and work return row. Work all sts, turn piece and work return row. Cast off.
SIZE XXL + XXXL:
Work all sts, turn piece and work return row. Work 70-74 sts, turn piece and work return row.
Work all sts, turn piece and work return row.
Work 56-58 sts, turn piece and work return row.
Work all sts, turn piece and work return row.
Work 42 sts, turn piece and work return row. Work all sts, turn piece and work return row. Work all sts, turn piece and work return row. Work 28 sts, turn piece and work return row. Work all sts, turn piece and work return row. Work all sts, turn piece and work return row. Work 42 sts, turn piece and work return row. Work all sts, turn piece and work return row. Work 56-58 sts, turn piece and work return row. Work all sts, turn piece and work return row. Work 70-74 sts, turn piece and work return row. Work all sts, turn piece and work return row. Cast off.
Sew tog Square 4 and 5, edge to edge with neat sts. Sew tog Square 5 and 6 in the same way = 1 row with 3 squares. See Fig.1. The one long side has sts on stitch holders (= towards the side) and the other side cast off sts (= towards square 1, 2 and 3). Sew the side with cast off sts to gusset, edge to edge with neat sts.
Slip sts from stitch holders along the other side of the 3 squares on the same needle = 72-78-78-84-84-90 sts.
Now work Gusset as described above. Slip all sts on a stitch holder.
RIGHT FRONT PIECE:
See Fig.2 and work like left front piece. Cast off all sts after the last gusset.
BACK PIECE, bottom part:
Slip sts from stitch holder at the side of left front piece back on needle. Insert a marker in piece, and now measure piece from here. Work garter st back and forth on needle on all sts until piece measures 10-11-11-12-12-13 cm from marker. Now work Gusset as described above. After gusset insert a new marker, and continue back and forth on all sts in garter st. When piece measures 20-22-22-24-24-26 cm from the new marker work Gusset as described above. After gusset insert a new marker, and back and forth on all sts in garter st. When piece measures 10-11-11-12-12-13 cm from the last marker cast off.
Sew cast off row to cast off row on gusset on right front piece, edge to edge with neat sts.
FRONT AND BACK PIECE, upper part:
Worked back and forth from mid front in garter st.
Beg on right front piece towards mid front (i.e. at the top right hand corner of Square 3 – see Fig.2). Row 1 = RS.
SIZE S + M:
Slip the 24-26 sts from stitch holder back on needle, pick up 3 sts over gusset, then slip the next 24-26 sts (from square 6 in Fig.2) back on needle, pick up 3 sts over gusset and insert a marker in the middle of these 3 sts (= the side). Pick up 102-110 sts along back piece, then pick up 3 sts over gusset at the other side and insert a marker in the middle of these 3 sts (= the side). Now slip the 24-26 sts from stitch holder on square 6 on left front piece (see Fig.1) back on needle, then pick up 3 sts over gusset and slip the last 24-26 sts from stitch holder towards mid front on left front piece (square 3 in Fig.1) back on needle = 210-226 sts. Insert a marker, and measure piece from here. Continue back and forth on all sts in garter st. When piece measures 11 cm from marker cast off 7 sts each side for armhole (i.e. 3 sts each side of st with marker + st with marker) = 196-212 sts. Now complete each piece separately.
SIZE L + XL + XXL + XXXL:
Slip the 26-28-28-30 sts from stitch holder back on needle, pick up 6-6-10-10 sts over gusset, then slip the next 26-28-28-30 (from square 6 in Fig.2) back on needle, pick up 6-6-10-10 sts over gusset and insert a marker in the middle of these 6-6-10-10 sts (= the side). Pick up 116-124-132-140 sts along back piece, then pick up 6-6-10-10 sts over gusset at the other side and insert a marker in the middle of these 6-6-10-10 sts (= the side).
Now slip the 26-28-28-30 sts from stitch holder on square 6 on left front piece (see Fig.1) back on needle, then pick up 6-6-10-10 sts over gusset and slip the last 26-28-28-30 sts from stitch holder towards mid front on left front piece (square 3 in Fig.1) back on needle = 244-260-284-300 sts. Insert a marker, and measure piece from here. Continue back and forth on all sts in garter st, AT THE SAME TIME on first row inc 4-8-4-8 sts as follows: 1-2-1-2 sts evenly on each front piece and 2-4-2-4 evenly on back piece = 248-268-288-308 sts. When piece measures 11 cm from marker cast off 6 sts each side for armhole (i.e. 3 sts each side of marker) = 236-256-276-296 sts. Now complete each piece separately.
LEFT FRONT PIECE:
= 49-53-59-64-69-74 sts. Continue back and forth on needle in garter st AT THE SAME TIME cast off for armhole at the side on every other row: 2 sts 2-3-5-7-9-11 times and 1 st 1-2-2-2-2-2 times = 44-45-47-48-49-50 sts. When piece measures 18-19-18-19-18-19 cm from marker cast off 4 sts towards mid front for neck and cast off to shape the neckline at the beg of every row from mid front: 2 sts 1 time and 1 st 5-5-5-6-7-7 times, then on every other row from mid front: 1 st 5-6-7-7-7-8 times = 28-28-29-29-29-29 sts left on shoulder. Continue until piece measures 30-31-32-33-34-35 cm from marker. Cast off loosely.
BACK PIECE:
= 98-106-118-128-138-148 sts. Continue in garter st and cast off for armhole each side as described for front piece = 88-90-94-96-98-100 sts. When piece measures 28-29-30-31-32-33 cm from marker cast off the middle 28-30-32-34-36-38 sts for neck and complete each side separately. Cast off 1 st on every other row 2 times on neckline = 28-28-29-29-29-29 sts left on shoulder. Cast off loosely when piece measures 30-31-32-33-34-35 cm from marker.
RIGHT FRONT PIECE:
= 49-53-59-64-69-74 sts. Like left front piece.
SLEEVE:
Work SQUARE (in your size) – see above. Slip 24-26-26-28-28-30 sts from 3 of the sides on separate stitch holders and keep 24-26-26-28-28-30 sts from the last side on needle.
Work garter st back and forth on these 24-26-26-28-28-30 sts for 7 cm. Cast off.
Slip the 24-26-26-28-28-30 sts from stitch holder on the opposite side (i.e. the parallel side) back on needle. Work garter st back and forth on needle for 7 cm. Cast off.
Turn square so that you have 7 cm garter st on the right side and on the left side of square. Now pick up (from RS) 17 sts in the garter st on the left side of square, work the 24-26-26-28-28-30 sts from stitch holder back on needle and then pick up 17 sts in the garter st on the other side of square = 58-60-60-62-62-64 sts. Work garter st back and forth on all sts for 2 cm. Cast off.
This is the cuff of the sleeve, the last 2 cm garter st is the bottom edge of sleeve.
Now pick up 17 sts in the 7 cm garter st on one side of square, work the last 24-26-26-28-28-30 sts from stitch holder back on needle and pick up 17 sts along the garter st on the other side of square = 58-60-60-62-62-64 sts. Work 2 cm garter st back and forth on these sts. Insert a marker and now measure piece from here.
Now continue in reverse stocking st on all sts. AT THE SAME TIME when piece measures approx 1-1-2-1-2-2 cm from marker inc 1 st each side, and repeat the inc on every 2.5-2-1.5-1.5-1-1 cm a total of 12-14-17-18-22-24 times = 82-88-94-98-106-112 sts. When piece measures 34-32-32-30-31-28 cm from marker (less for the larger sizes because of longer sleeve cap and wider shoulder) cast off 3 sts each side for armhole and cast off for sleeve cap each side at the beg of every row: 2 sts 5-6-6-6-6-6 times and 1 st 1-1-3-5-3-7 times, then 2 sts each side until piece measures 41-40-41-40-41-40 cm from marker. Now cast off 3 sts 1 time each side and cast off remaining sts. Sleeve measures approx 56-56-57-57-58-58 cm.
ASSEMBLY:
Sew shoulder seams. Set in sleeves and sew sleeve seam inside 1 edge st.
FRONT BANDS:
Left front band: Beg by neckline at the top of left front piece. Pick up approx 1 st in every garter st row down to the squares, slip the 24-26-26-28-28-30 sts (x 3) from stitch holders towards mid front on the 3 squares back on needle. K 1 row from WS, AT THE SAME TIME adjust no of sts to 116-122-122-132-132-140. Work 26 rows garter st back and forth on all sts and cast off loosely. Right front band: Like left front band, but beg at the bottom of front piece (sts already cast off on squares), AT THE SAME TIME after 14 rows make 6 buttonholes as follows from RS (beg from bottom edge):
Work 14 sts, K2 tog, 1 YO, * work 15-16-16-18-18-19 sts, K2 tog, 1 YO *, repeat from *-* a total of 5 times and finish with 15-16-16-16-16-19 sts. K all sts, incl YO, on next row.
NECKLINE:
Pick up 120 to 160 sts (from RS) round neck (includes sts on front bands each side). Work garter st back and forth over all sts, AT THE SAME TIME after 4 rows make 1 buttonhole on the right side of piece as follows: work 4 sts, K2 tog and make 1 YO, work remaining sts on row. Continue as before and cast off loosely after 10 rows. |
| |
|

Ponieważ na forum pojawia się coraz więcej
materiałów, zdjęć, itp.,
proszę każdego, kto będzie miał jakiekolwiek zastrzeżenia odnośnie
naruszenia praw autorskich o kontakt ze
mną.
Postaram się jak najszybciej materiały tego typu usunąć lub jeśli to
będzie możliwe uzyskać zgodę na ich publikację.
Jednocześnie informuję, że administrator forum nie
odpowiada za treść wypowiedzi innych użytkowników,
a tym samym nie może być pociągany do odpowiedzialności za owe wypowiedzi.
maranta
 |
| | Strona wygenerowana w 0,12 sekundy. Zapytań do SQL: 11 |
|
|


 Regulamin, Polityka Prywatności, cookies
 Artykuły
 FAQ
FAQ Szukaj
 Użytkownicy
 Grupy
Grupy Kalendarz
 Statystyki
 Rejestracja
 Zaloguj
 Album
Album Download